Superannuation - ClickSuper
Introduction
Superannuation is now paid to your employees through a clearing house. Through out this page you will find some very helpful information regarding the registration of an account with ClickSuper, configuring your ClickSuper account within Eclipse Payroll & processing a superannuation payment to ClickSuper.
Registering With ClickSuper
After You Have Registered With ClickSuper
If you have already registered with ClickSuper, go to After you Have Registered with ClickSuper.
To register with ClickSuper, navigate to the ClickSuper website: https://clickstream.p.vu/Organisation/Register and complete the fields/questions using the below as a guide:
a. Company Details
- Please ensure that you use the Company name for each ABN as registered with ASIC.
- Enter ABN and select ASIC registered name from drop down list.
b. System Administrator Details
- This is the person who will be operating the ClickSuper account.
- Login credentials are emailed to the email address you provide for the system administrator field when you submit your application.
- The System Administrator has full access to all ClickSuper functionality and can invite extra users with different levels of ClickSuper access.
c. Service Details
- The File Upload Code for Ultimate Business Systems Customers is:ULT001– Please note numbers: 01

- You will then see the below:
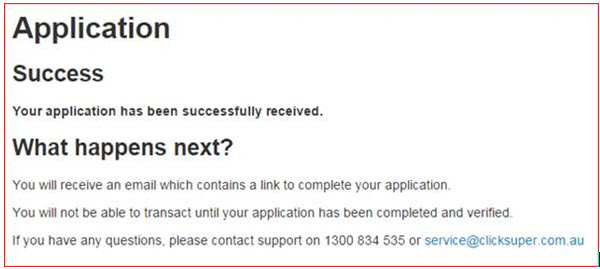
- Click on Link in the e-mail.
d. Company Details
- Enter address and contact details.
- Typically the ClickSuper System Administrator contact details are the best contact details for the Funds and ClickSuper to liaise with if required.
e. Banking
- Enter the BSB, Account Number and Account Name which you would like ClickSuper to debit to pay your contributions.
- Please check this information to ensure it is correct to avoid any failed transactions due to data entry errors.
f. Office Holder(s) as registered with ASIC
- Incorrect data in this section will delay completion of your registration and consequently delay your initial payments.
- The nominated office holder(s) must be registered as an office holder on the ASIC registration for the ABN you are registering with ClickSuper.
- This is usually a Director or Company Secretary.
- Only one Office Holder is required per registration.
- When the online application is submitted, a link to complete the online application form is immediately emailed to the office holder.
g. I don't have a second office holder
- The Office Holder must then confirm and enter their detail online and a driver’s licence (certification not required) may be needed to complete the application.
h. ClickSuper notification e-mail address
- It is important for you to provide a group email address to avoid emails being missed due to absent staff members.
- This would normally be the department who administers the superannuation payments, either accounts or payroll department.
- Please note there is a $20.00 establishment fee.
Payments can only be made upon completion of your registration.
1. ClickSuper Account Access.
This email is sent from ClickSuper to the Office Holder, as outlined when you registered with ClickSuper.
You need to follow the instructions within this email to activate your ClickSuper account. Retain this email for future reference to log in to the ClickSuper website to maintain your ClickSuper account.
2. Gateway Access.
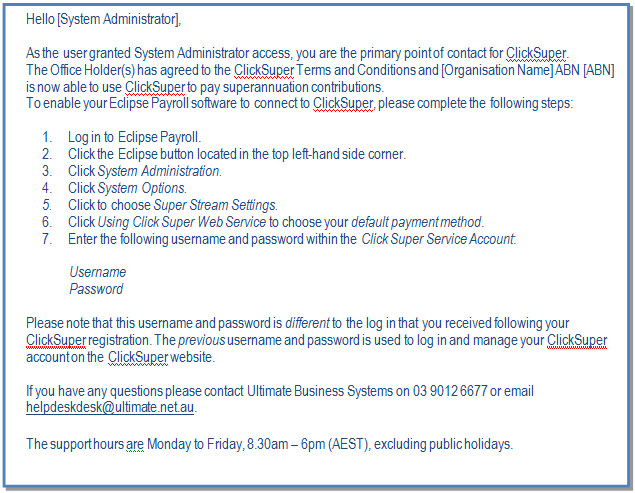
Upon activating your ClickSuper account, using the first email from ClickSuper, a second email will be sent from ClickSuper to the System Administrator, as outlined when you registered with ClickSuper. An example of this email is below.
Again, retain this email for future reference. As the email suggests, you need the username and password for use in Payroll.
The username and password allows Eclipse Payroll to upload your super payment files to the ClickSuper website. Without this information, you will not be able to upload your files for payment.
3. Ensure you have Eclipse Payroll version 4.5 or later (check your version number as located at the top of the Payroll window).
4. Contact us if you have any queries regarding any of the above points.
Fees.
What are the fees for using Click Super as an Ultimate Business Systems Channel Partner*?
- ClickSuper Setup Fee: $20
- ClickSuper Transaction fee for each individual payment: $0.10
- ClickSuper will charge a monthly facility fee which Ultimate Business Systems will pay on your behalf.
Ultimate Business Systems will then charge a monthly fee of $25 - There are other transaction fees that will be fully explained in a PDS, but these are for exceptions such as returned payments, bounced direct debits etc.
Configuration Within Eclipse Payroll
Activating ClickSuper (Within Eclipse Payrol)
Once your dealership is registered and you have obtained the two emails from ClickSuper, you need to activate ClickSuper within Eclipse Payroll.
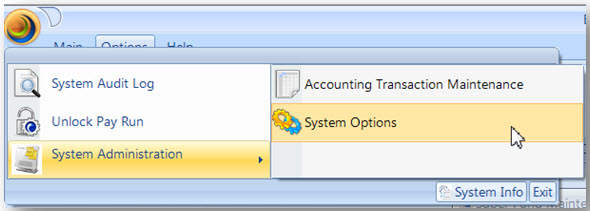
1. To activate ClickSuper within Payroll, log in to Eclipse Payroll.
2. Click on the Eclipse button located in the top left-hand-side of the window.
3. Click System Administration.
4. Click System Options:
5. Click Super Stream Settings.
6. Click the radio button to select Using Click Super Web Service:

7. Type the Username and Password as provided to you in the email from ClickSuper.
Ensure that you enter the correct username and password that you received from ClickSuper. Remember, you will have received two emails. Only the Gateway username and password will allow you to upload your super payment files from Payroll to the ClickSuper website.
8. In the field, Max number of records to return from query, in the space provided, type the number 50.
This means when you are performing a search to obtain a super fund’s Unique Super Identifier/Superannuation Product Identification Number (USI/SPIN), a maximum of 50 records will display in the search results.
Ensure you do not leave this field blank.

9. Click the Save button:
Validating Eclipse Payroll (Against ClickSuper)
Now is also an opportunity to check the Australian Business Number (ABN) that you have registered with ClickSuper matches the ABN you have saved in Eclipse.
Matching ABN numbers will ensure successful uploading of data from Eclipse Payroll to ClickSuper.
1. In Eclipse Payroll, click on the Options tab:

2. Click on Company.
3. Check your dealership’s ABN matches the ABN saved in ClickSuper (if need be, log in to ClickSuper website using the username and password that you received via the first email from ClickSuper not the Gateway email).
4. If there is a discrepancy in the ABN field, adjust it now in Payroll.
5. Log in to Eclipse Stock & Accounting.
6. Click on the Eclipse button located in the top left-hand-side of the window.
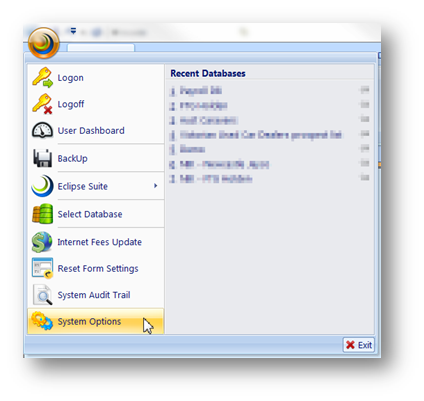
7. Click the System Options button:
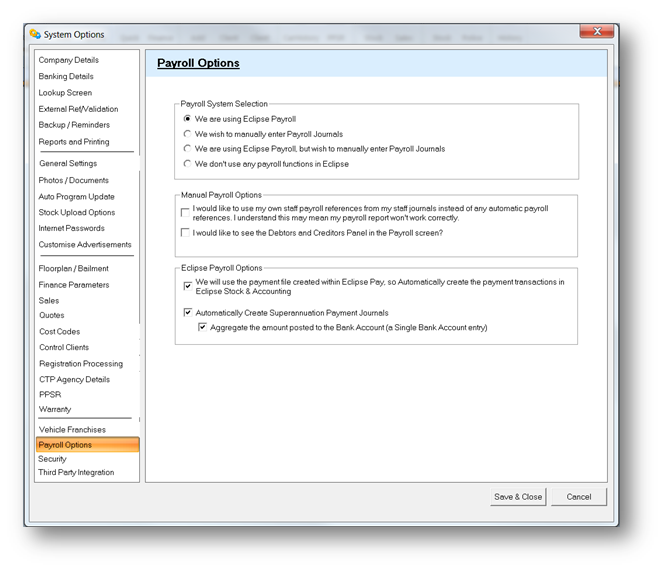
8. Click Payroll Options menu from the left-hand side:
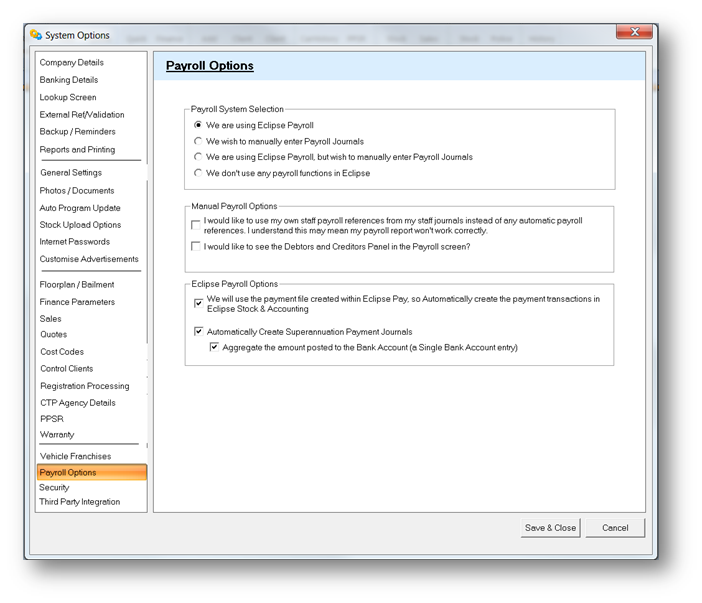
9. Select the Payroll System Selection as bellow:
10. Is is recommended that you select the following Eclipse Payroll Options:
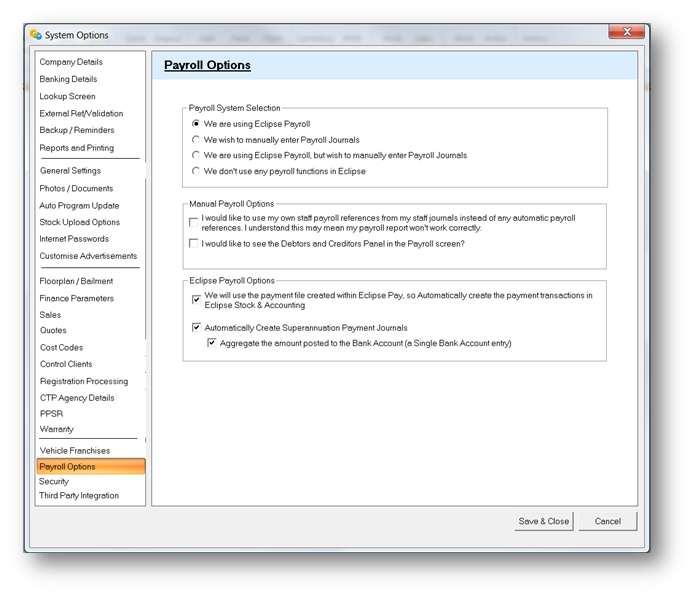
By not ticking Aggregate the amount posted to the Bank Account, you will have multiple transactions appearing in your bank statement.
11. Click the Save & close button.
Setting Up Superannuation Funds
Upload Super Payment File to ClickSuper
1. You will need to set up each of your employee’s superannuation fund details.
2. Collect the following information:
- A list of employees and the superannuation fund that each employee is signed to.
- Each superannuation fund’s ABN.
- Each superannuation fund’s contact name.
- Thesuper clearing account you wish to use.
It is recommended, although not compulsory, that you also collect the following information for each fund:
- Fund ESA.
- Bank account name (only required for self-managed super funds).
- Account BSB (only required for self-managed super funds).
- Account number (only required for self-managed super funds).
- Fund address.
- Phone number.
- Fax number.
- Email address.
- Website.
3. Methods for collecting data, such as a super fund’s ABN, can be obtained via:
- You should have received an Excel spreadsheet from us that outlines the majority of super funds and their details. If you didn’t receive this spreadsheet, please download it here - Attachment to Instructions - SuperStream Compliant and Non-Compliant Super Funds.xlsx
- Telephone – call the super fund directly.
- Consulting the Australian Government’s Super Fund Look Up Tool:http://superfundlookup.gov.au/lookuptool.aspx
4. Once you have each fund’s information, within Eclipse Payroll, click the Options tab.
5. Click the Super Fund menu button:

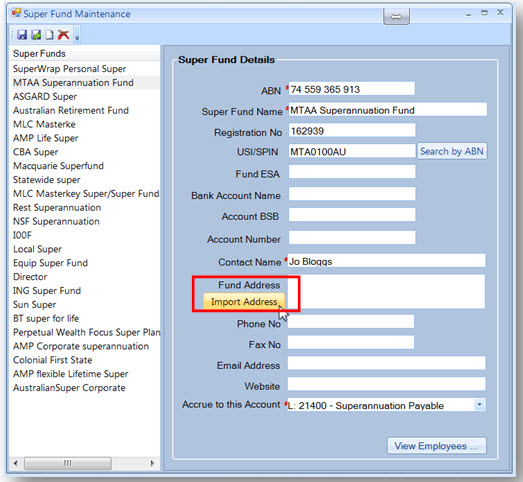
6. You will be presented with the Super Fund Maintenance Screen:
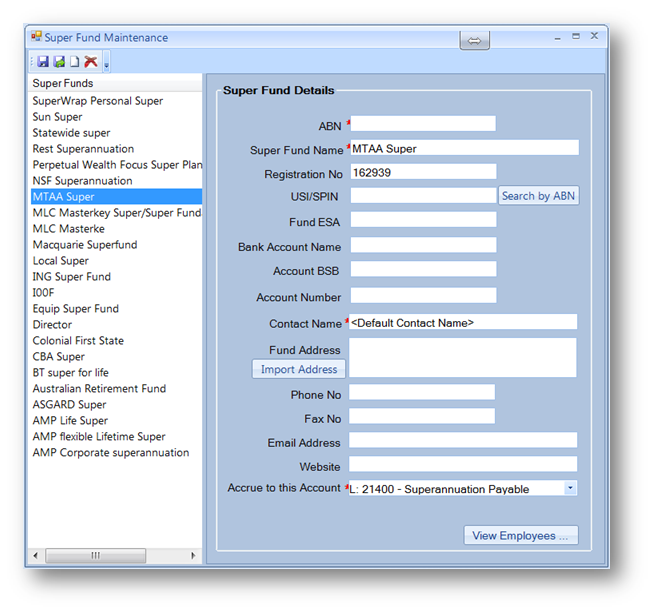
7. A list of some super funds are listed on the left-hand-side under the heading, Super Funds.
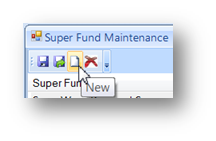
8. For any super funds listed within the Super Funds list, click the fund name or for any super funds that are not listed, click the New button to open a blank Super Fund Details record.
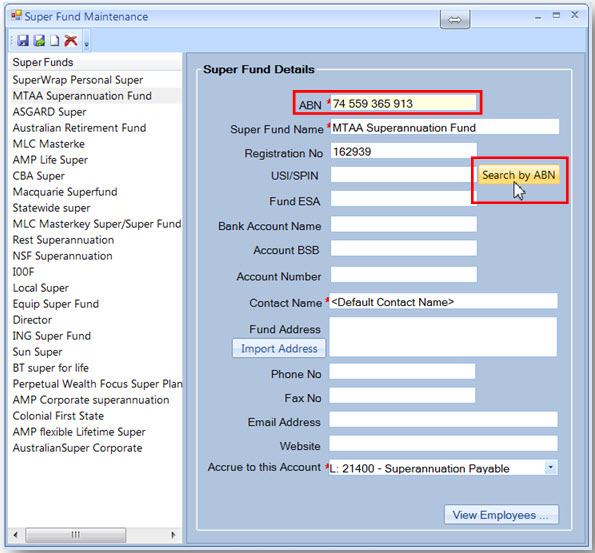
9. Enter the super fund's ABN.
10. Click the Search by ABN button to retrieve the Unique Super Identifier/Superannuation Product Identification Number (USI/SPIN).
11. Click the black arrow next to the appropriate search results to select a fund.
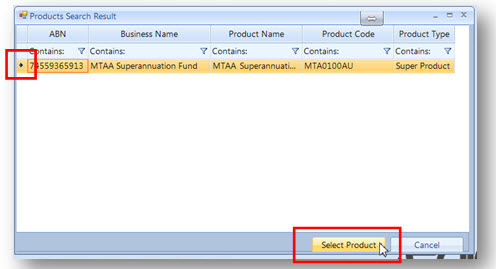
12. Click the Select Product button.
13. Click the Import Address button to search for the Fund address.
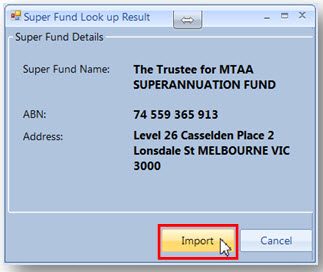
14. Click the Import button to populate the Fund address field.
15. Using the information you've gathered, complete the remaining fields in the Super Funds Maintenance Screen.
** Note: the the fields marked with a red asterisk ( * ) are compulsory fields.
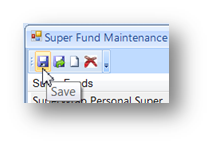
16. Click the save button.
17. Repeat steps 8 to 16 for every super fund.
COMPLETE THE FOLLOWING STEPS EACH TIME YOU PAY YOUR EMPLOYEES THEIR SUPERANNUATION.
1. Complete a usual Payrun. It is assumed you know how to process a pay schedule. Should you need assistance, contact us for help with completing a pay schedule.
2. After you've completed a Payrun, click on the Super Payment Register button.

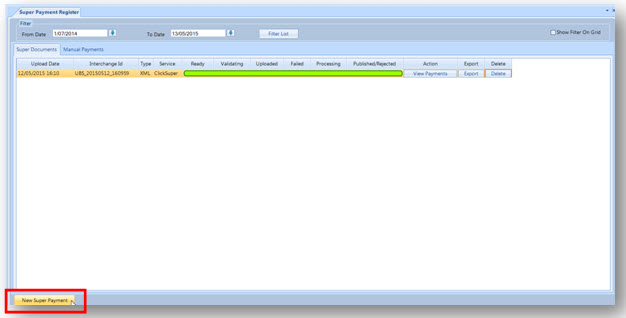
3. Click on the New Super Payment button.
4. Tick the Paid box for the employees that you wish to pay superannuation.
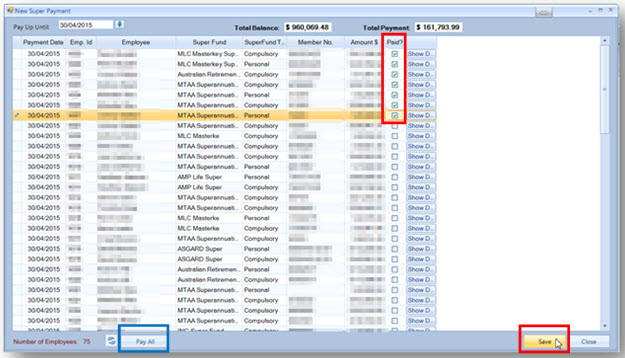
Hint: If you wish to pay all the listed employees their superannuation, click the Pay All button. Otherwise, click the Save button.
5. The transaction is now set as Ready.
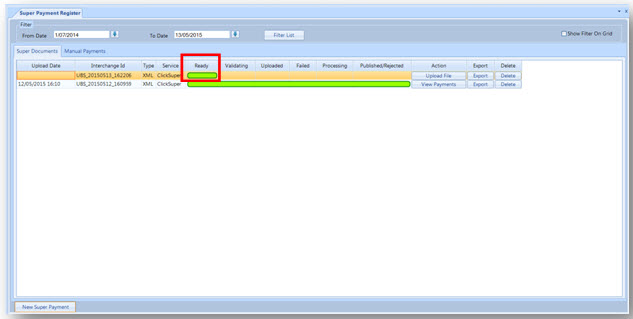
6. Your file will continue to move through the steps of: Validating | Uploaded | Failed | Processing | Published/Rejected

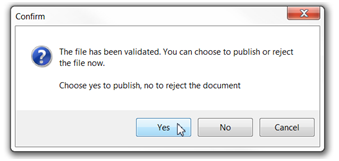
7. Click the Upload File button to Validate.

8. Click the yes button to Upload.

Note: The words under Action may very. Variations my include; Check Status.
9. Keep clicking the button below Action until you have successfully Published/Uploaded your file.
10. Should all your data be error-fre, you will move through all the steps.


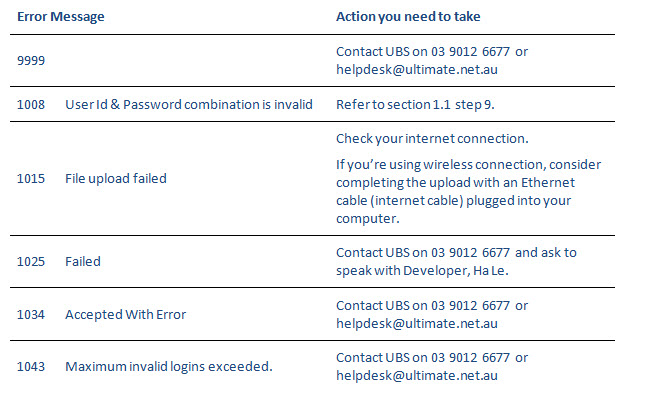
Should you receive any errors, please refer to section Validation Errors and/or log in to the ClickSuper website and check the Uploads tab.
11. Click view Payments to see how much has been paid to each super fund.

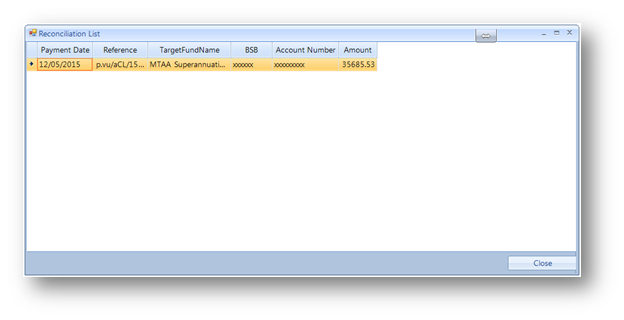
12. Click the Close button.
Note: You have the ability to export your payment data as either a .csv file (preferred) or by clicking the Export button.Please contact us should you require this action.

Creating ClickSuper Payment Transaction Within Eclipse Stock & Accounting
Following a Successful Super Payment Upload
COMPLETE THE FOLLOWING STEPS EACH TIME YOU HAVE SUCCESSFULLY UPLOADED A SUPER PAYMENT
1. Log in to Eclipse Stock & Accounting.
2. Click on the Staff tab.
3. Click on the Import Payroll button.

To check that your super-clearing account has been automatically cleared, as per the system options:
1. Click on Accounts Payable.
2. Click Make Payments, followed by Bulk Payments & Transfers.
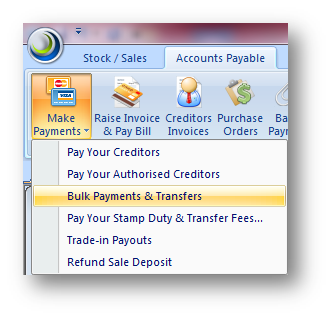
3. Click the three dots button to select your super clearing account.
4. Click the "Transfer All" button.
5. If this is your first time using Super Payments within Payroll, you might have the amounts that you ticked in Payroll still appearing in your super clearing account.
If this is the case, this should only be in the first instance of you completing your first super payment. Moving forward, you shouldn’t have any amounts appearing in your super clearing account.
6. If you need to transfer funds from your super clearing account, click the three dots button to select the To Account.
7. Choose your bank account.
8. Choose your payee (that is, ClickSuper. Make sure that you have ClickSuper saved as a client).
9. Record the Date and type.
10. Enter a Reference (Ref #) and Narration that is relevant.
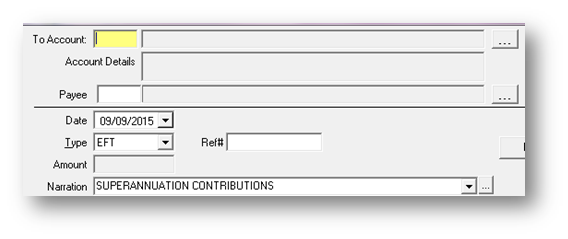
11. To enter the Amount, click on the same transactions that you ticked in Payroll to highlight them with an orange circle.
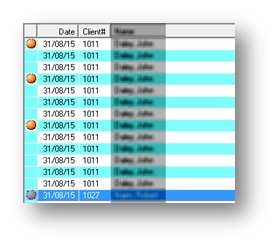
12. Click the Post button.
FOLLOWING A SUCCESSFUL SUPER PAYMENT UPLOAD, IT IS ADVISABLE THAT YOU:
1. Check the status of your uploaded super payment file (on the ClickSuper website) and;
2. Check ClickSuper's Auto Schedule is turned on.
To check the Status of your super payment file:
a. Log onto the ClickSuper website.
b. Click on the Upload tab.
c. A status of Success means that your file is ready to be disbursed.
To check the Auto Schedule:
a. Log onto the ClickSuper website.
b. Located on the right-hand side of the window, within the black bar, click on your business name.

a. Click on the Payment Options tab.
b. Check that Auto Schedule is ticked.

When Will My Super Payment File Be Processed?
Validation Errors
Below is an extract of information provided by ClickSuper;
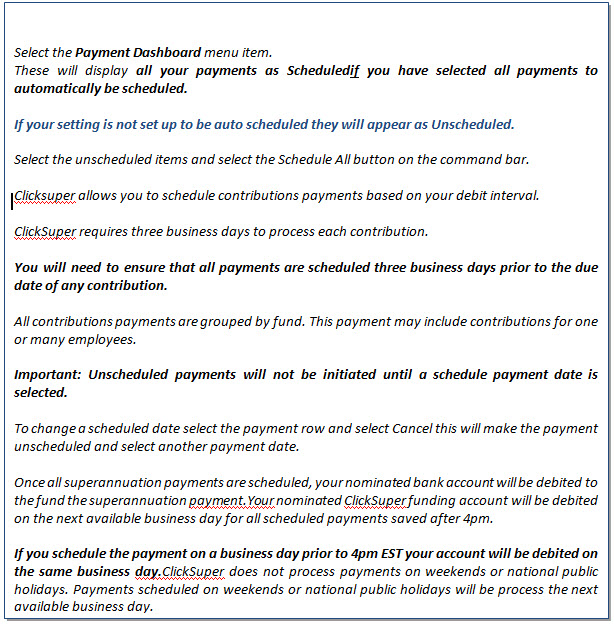
Once you have successfully uploaded a super payment file to ClickSuper, you will be direct debited as per the Direct Debit selection set-up with ClickSuper.
ClickSuper will disburse super, on your behalf, to your employee’s super funds.
During the upload stage, if you receive any error messages please refer to the below table;
Downloadable Documents
Please feel free to download the above information in the document below:
ClickSuper Instructions For Eclipse - ClickSuper Instructions for Eclipse v9.pdf
SuperStream Compliant and Non-Compliant Super Funds - Attachment to Instructions - SuperStream Compliant and Non-Compliant Super Funds.xlsx