How to setup and pay TOIL for Overtime worked
Applies to Eclipse Payroll v11.1 or higher
Introduction
Eclipse Payroll now supports the paying of Time-Off-In-Lieue (TOIL) of Overtime.
This feature allows Employees to bank leave that can be taken later instead of being paid money for Overtime worked. The rate at which the Leave accrues is determined by the Overtime rate. If the Overtime Rate is 1.5x normal pay, then for each hour worked on this Rate, 1.5 hours of Leave are accrued instead of the Employee receiving any pay for it. TOIL paid as Overtime is a new type of special rate.
TOIL leave accrued in this way can be Taken by the Employee at a later date, or can be Cashed Out.
Note that typically TOIL Leave has rules around taking the leave within a certain time-frame. For example, a common arrangement is that Leave must be Taken or Cashed out within a certain number of days after accruing the leave. Eclipse includes tools to help you manage this requirement.
When taken or cashed out, note that TOIL is paid at the Employees current base rate.
Overview of Steps
To use TOIL in Eclipse Payroll, at a high level, you must do the following:
- Setup a TOIL Leave
- Add the new Leave to the Pay Grades for the Employees you wish to apply the Leave to.
- Setup the Pay Grade Special (TOIL Accrual) Rates in the Pay Grade Special Rates tab
- Add the Leave to the Employee's you wish to receive it.
- Use the Pay Editor to record the payment of TOIL in the same way you would any OT.
- Taking the TOIL leave is handled in the Pay Editor in the same way any Leave Taken is.
Detailed Instructions
The work flow for setting up TOIL is as follows:
- Create a new Leave of Leave Class TOIL. Note that TOIL Leave must be of Leave Type No Accrual. Also note that no Leave Periods are required for this Leave.
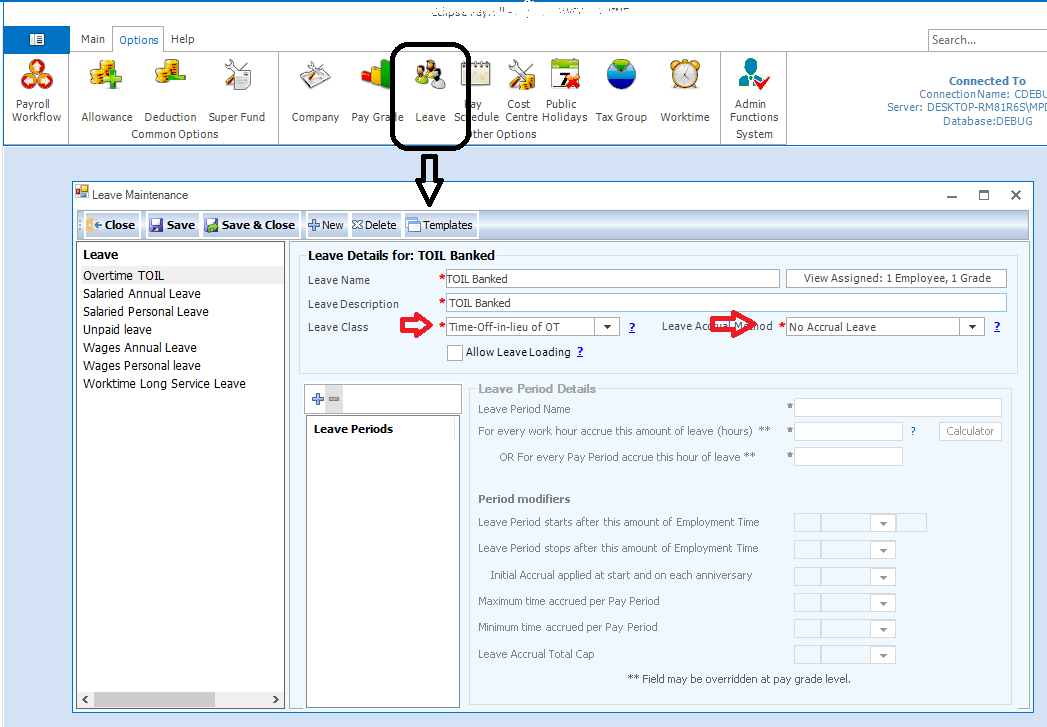
2. In the relevant Pay Grades:
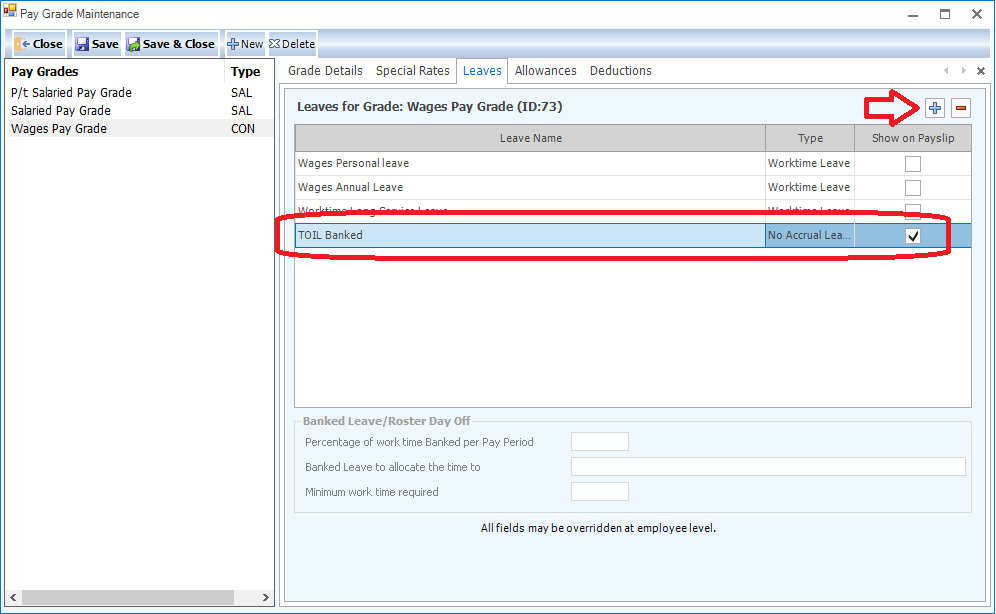
a. Link the new TOIL leave to the Grade.
-
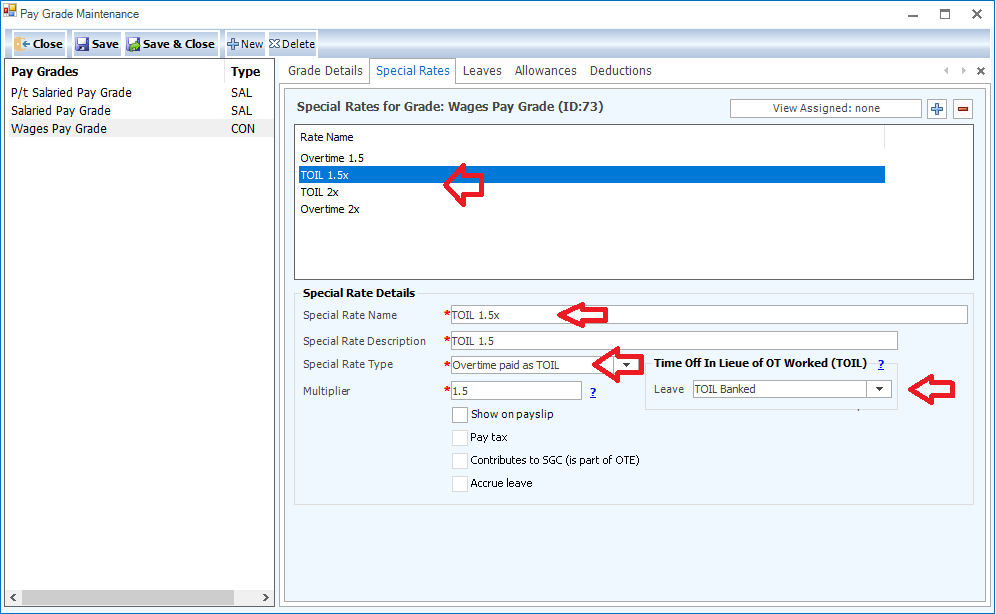
- b. Create 1 or more Overtime paid as TOIL rates as required. Link the rate to the TOIL Leave. Note you can have both normal OT and OT Paid as TOIL rates and more than one of each type.
3. Using the Employee Editor, add the new TOIL Leave to the Employee's Leave Setup. The easiest way to do this is to click the Import from Pay Grade button but you can also use the Add button. Not other setup is required. Save your changes!
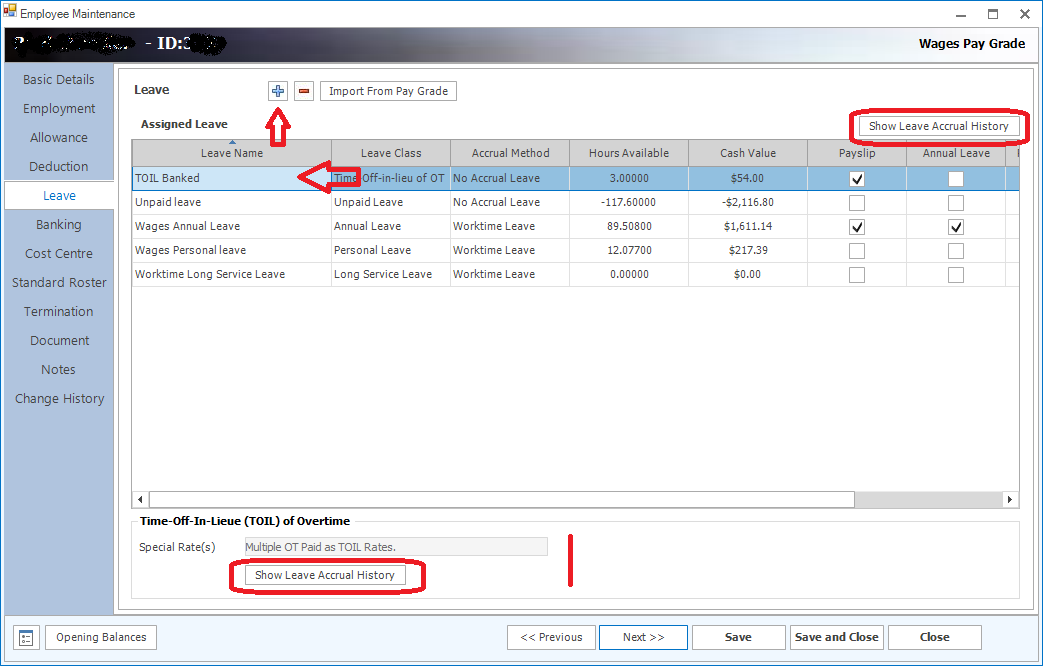
Note the Leave Accrual History buttons. These are explained below.
To "pay" Overtime as TOIL instead of normal overtime pay:
- In the Payrun, create the Employee's Pay as per normal.
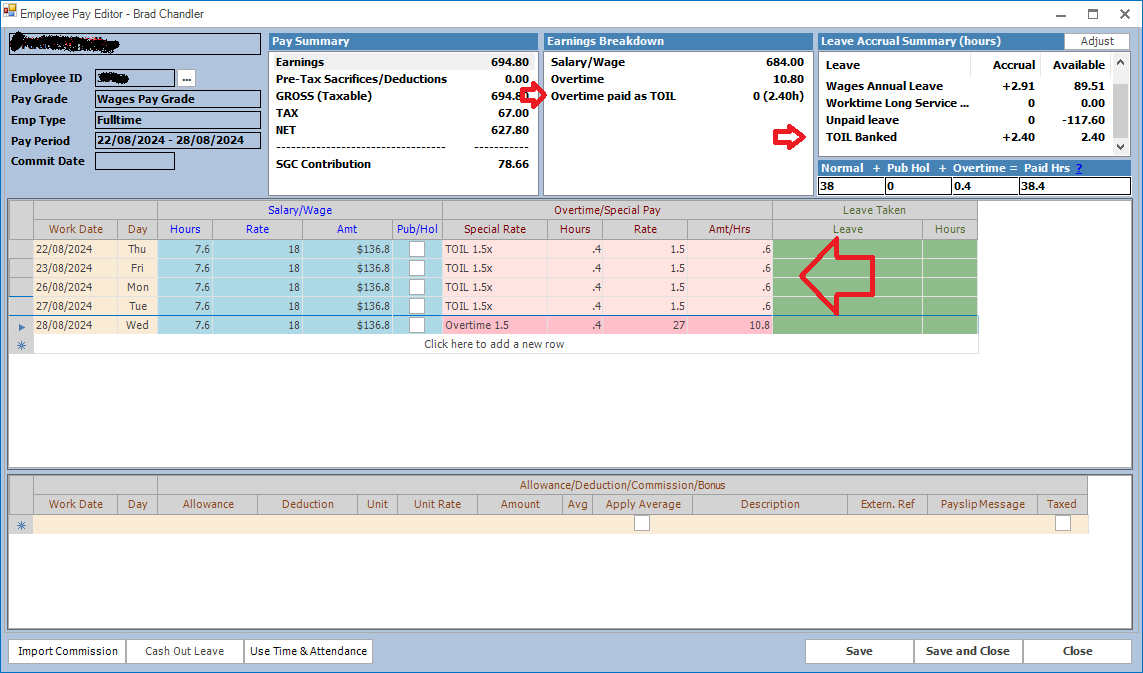
- In the Pay Editor, use the Overtime columns as you would normally to indicate OT has been worked. The Rate you select here should be one of the Special Rates you created for OT paid as TOIL in the Grade. Note that TOIL rates appear as a lighter shade of red in the Pay Editor grid so as to highlight them. Note also that the Earnings Breakdown will show the amount paid in Hours not dollars. There is no actual monetary payment associated with this transaction. The accrued time is shown in the Leave Accrual Summary also.
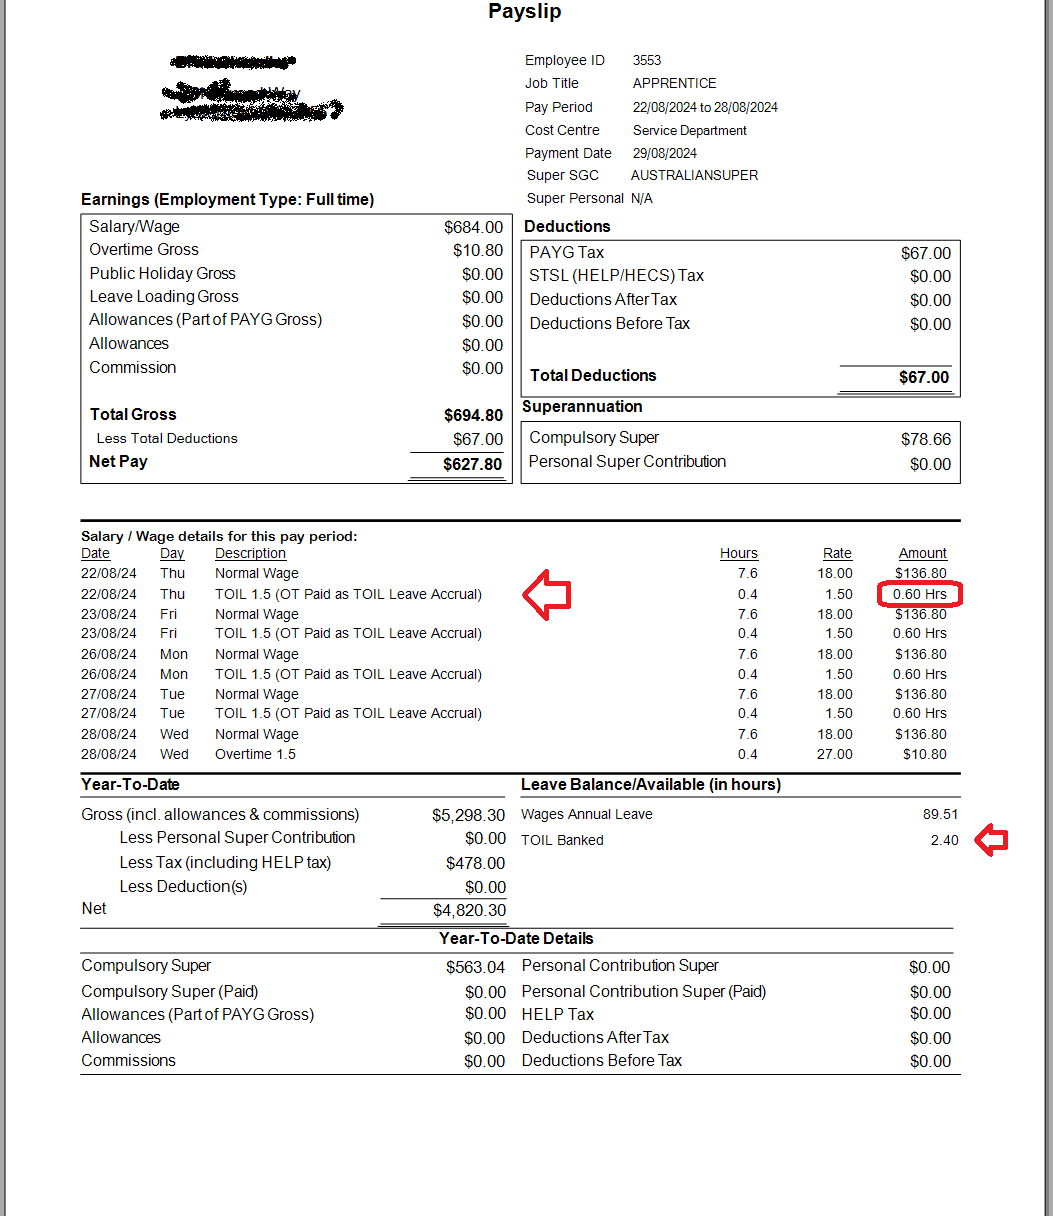
- Commit the pay. Note that the Payslip displays Overtime paid as TOIL as shown below:
To Take TOIL:
- In the Payrun, create the Employee's Pay as per normal.
- In the Pay Editor, use the Leave columns as normal, to indicate the amount of Leave taken.
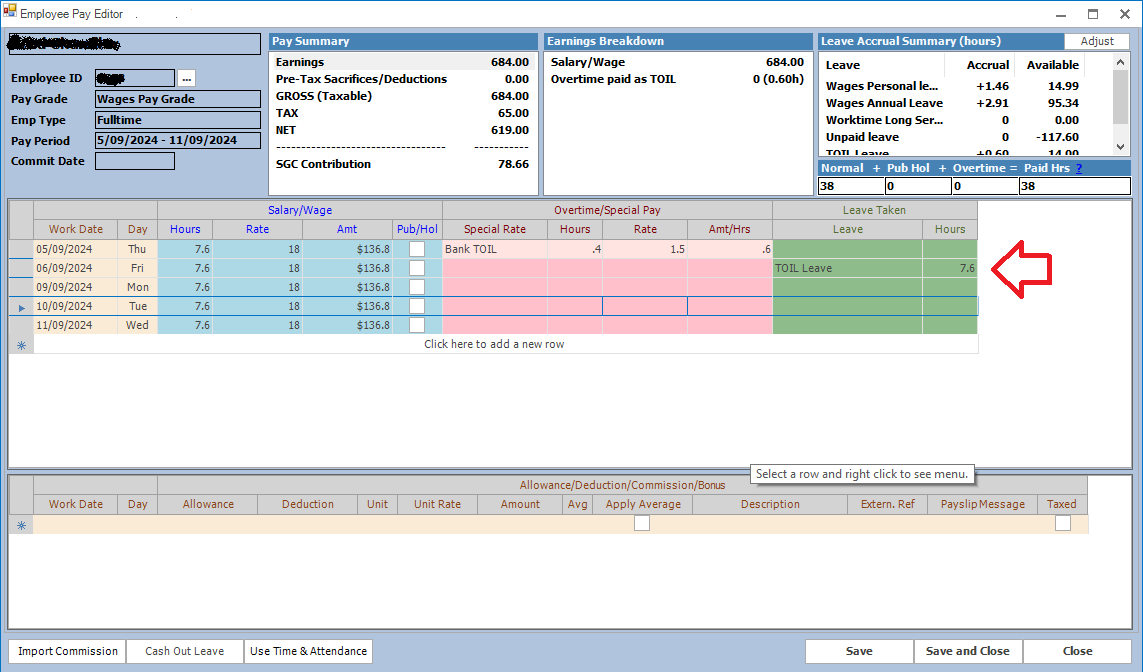
3. Commit the pay. The Payslip will reflect Leave Taken in the normal fashion.
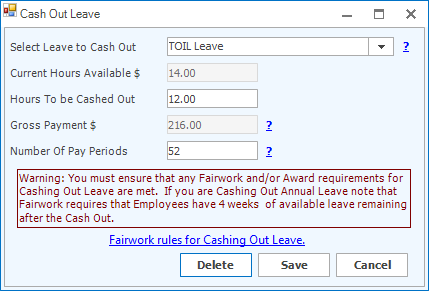
To Cash Out TOIL Leave:
Cashing Out of TOIL leave is handled using the current Cash Out Leave process in the Pay Editor.
Monitoring and reporting TOIL:
Employee Leave settings are managed from the Leave Tab in the Employee Editor. After creating OT as TOIL rates in the Grade, you need to make sure the Employees receiving this rate are linked to the Leave it uses to accumulate the banked TOIL hours.If you do not do this - the Rate will not be available for use in the Pay Editor.
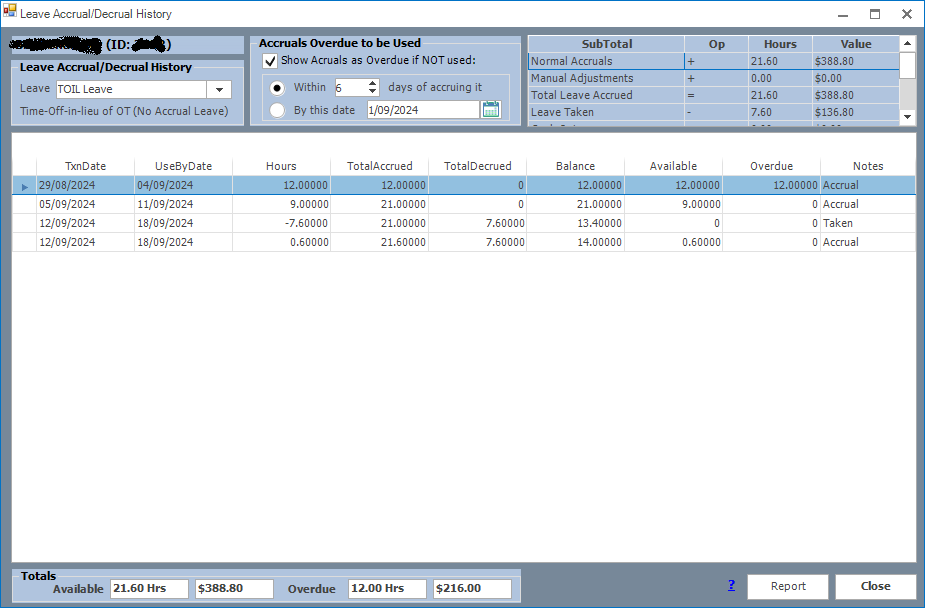
Note that we have added a new feature to the Employee Editor - Leave Tab to assist with the management of TOIL and other Leave classes. Note the addition of the Show Leave Accrual History buttons below. These provide access to a new screen which allows you to view the complete Accrual/Decrual history for any Leave attached to the Employee. The screen shows every accrual/decrual event to occur to the Leave and it allows you to monitor changes to the Balance over time.

Note the Accruals Overdue to be Used feature at the top of the screen (see screen shot below). This feature allows you to set a Use By Date for each Leave Accrual that has occurred for the Leave selected.
The example below shows how the Accruals Overdue to be Used feature has been set up to treat Accruals as overdue to be taken if not used within 6 days of accruing it (just as an example).
With this setup note the UseByDate and also the Overdue columns in the grid. The UseByDate shows the date that particular accrual must be used by according to the Overdue parameters set. The Overdue column contains the amount of hours NOT used from that Accrued amount based on Leave Taken/Cashed since the accrual occurred.
Note this information can be printed using the Report button and this can be distributed to your Employee to help them manage their taking of Leave.
If your TOIL agreement with Employees includes a provision to ensure TOIL Leave is used within a certain amount of time, then use this feature to track this. Note that the Payrun will not warn you as to when TOIL Leave must be taken or cashed out. You must manage this in conjunction with your Employee and using this tool.
